Video walkthrough
Watch the route, then match the frames
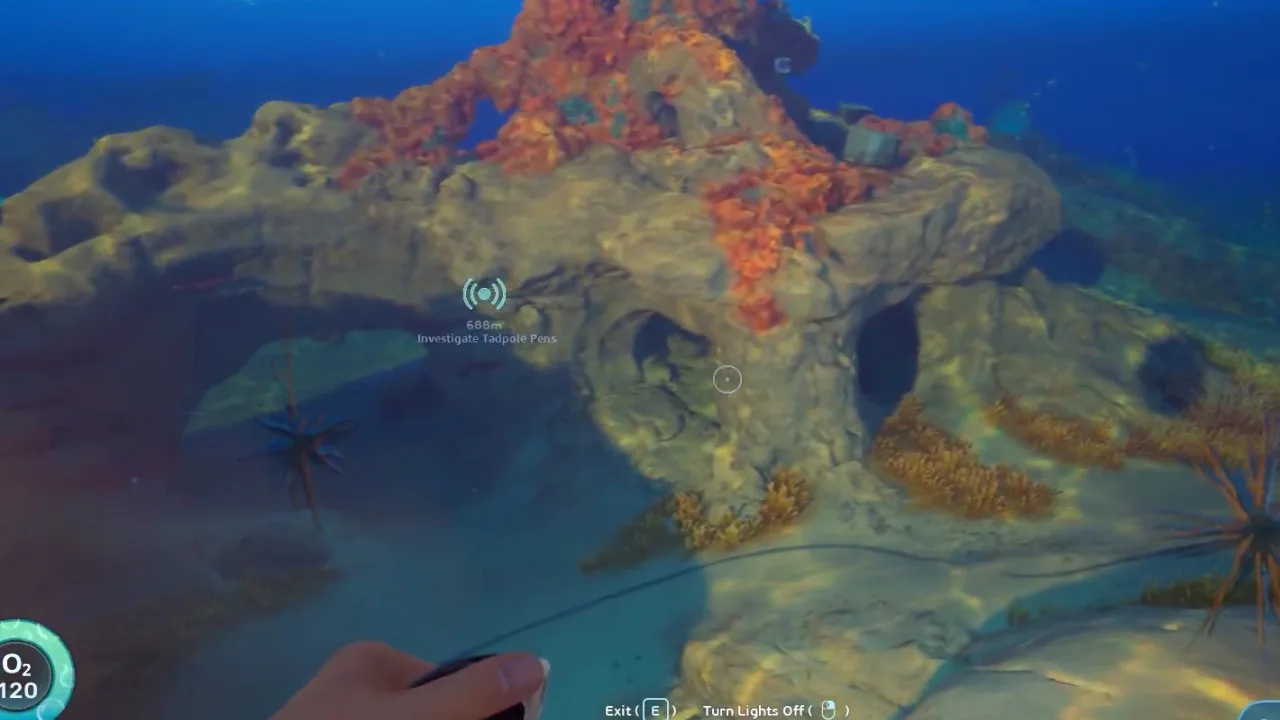 00:21Frame 1Sulfur routes work best when the player follows heat-colored terrain and returns the same way.
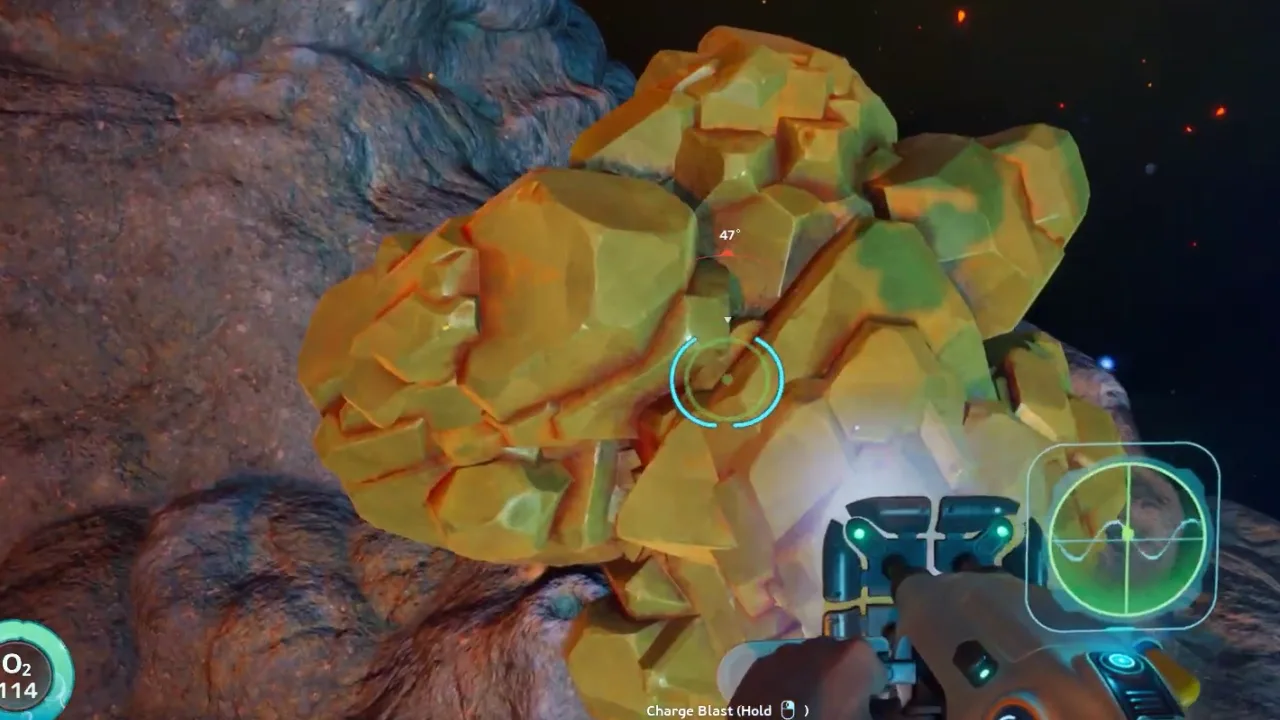 01:02Frame 2Look for the distinct yellow cluster against rock walls rather than sweeping open water.
 01:23Frame 3Turn the pickup into a short loop; do not spend the last oxygen bar checking side rocks.
Video references
Watch or inspect the route before you dive
Click YouTube cards to load the player. Open frame cards to compare local screenshot notes. Use the evidence to confirm landmarks, movement, and encounter pacing, then follow the written checklist below.
Sulfur location video reference
Watch for: Thermal terrain recognition and early route context.
Sulfur route comparison
Watch for: Route cross-check and material farming loop.
Thermal route marker frame review
Watch for: Start with Sulfur route guide at 00:21. Compare the screenshot cue, route note, and player action before following the guide in-game.
Video watch notes
What to pause, compare, and write down
Do not watch the video like entertainment only. Use these notes as a second-screen checklist: pause on landmarks, confirm the player action, then return to the written route.
Watchlist
Watch for the thermal terrain cue that appears before the Sulfur itself.
Pause when the pocket is visible and check whether the player still has a clean return line.
Compare routes that leave early versus routes that overstay; the safe loop is the one worth copying.
Thermal route
This frame establishes the environmental cue that makes the pocket repeatable.
Action: Approach slowly, check oxygen, and keep the exit behind you visible.
Sulfur pocket
The material is confirmed only after the player can distinguish it from surrounding glow and debris.
Action: Collect the target amount and avoid expanding the run into unrelated cave exploration.
Return path
The exit frame matters as much as the pickup because heat routes punish hesitation.
Action: Leave on the same line and write the landmark before starting another objective.
Video route timeline
Turn the video into playable checkpoints
Use this section like a second-screen route sheet. Open each checkpoint, compare the frame, do the action, then stop if your route no longer matches the video evidence. It keeps the guide useful even when Early Access shifts small placements or creature behavior.
00:21Checkpoint 1: Use the Welcome Center direction as an early southeast route anchor.This frame establishes the environmental cue that makes the pocket repeatable.Expand
Thermal route marker
Sulfur routes work best when the player follows heat-colored terrain and returns the same way.
Player action
Use the Welcome Center direction as an early southeast route anchor.
Proof before moving on
This frame establishes the environmental cue that makes the pocket repeatable.
Watch this timestampIf this fails
Back out to the last landmark, reset the angle, and re-enter only when the return line is clear.
01:02Checkpoint 2: Search thermal-looking rocks, vents, and shallow volcanic terrain.The material is confirmed only after the player can distinguish it from surrounding glow and debris.Expand
Sulfur pocket
Look for the distinct yellow cluster against rock walls rather than sweeping open water.
Player action
Search thermal-looking rocks, vents, and shallow volcanic terrain.
Proof before moving on
The material is confirmed only after the player can distinguish it from surrounding glow and debris.
Watch this timestampIf this fails
Take the recipe amount and leave; bulk farming can wait until the route is safer.
01:23Checkpoint 3: Avoid diving deeper just because the route keeps going.The exit frame matters as much as the pickup because heat routes punish hesitation.Expand
Return path
Turn the pickup into a short loop; do not spend the last oxygen bar checking side rocks.
Player action
Avoid diving deeper just because the route keeps going.
Proof before moving on
The exit frame matters as much as the pickup because heat routes punish hesitation.
Watch this timestampIf this fails
Copy the landmark chain, not the risky squeeze, unless your current build and loadout match.
00:21Checkpoint 4: Return and craft after confirming the material instead of chasing a full stack.This frame establishes the environmental cue that makes the pocket repeatable.Expand
Thermal route marker
Sulfur routes work best when the player follows heat-colored terrain and returns the same way.
Player action
Return and craft after confirming the material instead of chasing a full stack.
Proof before moving on
This frame establishes the environmental cue that makes the pocket repeatable.
Watch this timestampIf this fails
Back out to the last landmark, reset the angle, and re-enter only when the return line is clear.
01:02Checkpoint 5: Track whether patches move the resource cluster or change route hazards.The material is confirmed only after the player can distinguish it from surrounding glow and debris.Expand
Sulfur pocket
Look for the distinct yellow cluster against rock walls rather than sweeping open water.
Player action
Track whether patches move the resource cluster or change route hazards.
Proof before moving on
The material is confirmed only after the player can distinguish it from surrounding glow and debris.
Watch this timestampIf this fails
Take the recipe amount and leave; bulk farming can wait until the route is safer.
Gameplay evidence
Screenshots to match before you keep swimming
Use these frames as visual checkpoints. If the terrain, lighting, or landmark does not match, slow down and re-check the route instead of forcing the next step.
Thermal route marker
Sulfur routes work best when the player follows heat-colored terrain and returns the same way.
Sulfur pocket
Look for the distinct yellow cluster against rock walls rather than sweeping open water.
Return path
Turn the pickup into a short loop; do not spend the last oxygen bar checking side rocks.
Route decision lab
Decide if this route is worth running now
This section turns the video into a practical in-game decision. Use it before leaving base, after the first landmark, and again before entering a deeper or darker area.
Route purpose
Sulfur is commonly reported around early volcanic or thermal terrain, especially on the southeast route toward the Welcome Center. Search shallow hot-rock areas carefully and return before the route turns into a deep push.
Visual checkpoint
Sulfur routes work best when the player follows heat-colored terrain and returns the same way.
Map anchor
Sulfur Thermal Pocket in Kelp Trench thermal pocket. Use it for use this as a focused sulfur run instead of searching every warm-looking terrain pocket.
Abort rule
Confusing the route direction with a fixed permanent spawn.
Field manual translation
Sulfur routes are dangerous when players chase glow and heat without an exit plan. The useful pattern is to identify the thermal lane, confirm the Sulfur pocket, collect only what the recipe needs, and leave on the same route before heat, oxygen, or hostile wildlife forces a messy escape.
Primary job
Confirm thermal Sulfur pockets - The first successful run should prove the landmark and return path, not max out inventory.
Best entry habit
Heat lane scan - Read the terrain color and heat cues before committing to the pocket.
Stop condition
Heat plus low oxygen - Two pressure signals at once mean the route is over for this dive.
Patch-safe reading
Exact item positions can shift during Early Access. The useful part of this page is the route logic: what to prepare, what visual cue to confirm, what objective to finish, and when to turn back.
Updated
2026-06-12 / tracking / Early Access
What this guide covers
Requirements
- Starter route knowledge
- Oxygen margin
- Inventory room
Use this if
You want a route you can follow from video evidence without needing exact official coordinates. The screenshots and steps are written to help you recognize areas, landmarks, and decisions while playing.
Early Access can move details. Treat this as a video-based walkthrough and verify landmarks in your own build.
Step-by-step walkthrough
Follow the video route without guessing
Use the Welcome Center direction as an early southeast route anchor.
Use this step as a route checkpoint, not as a promise that every object spawns in one exact coordinate. Match the landmark, compare the screenshot, then continue only if the return path is still clear.
If your game build looks different, stay with the same decision: keep oxygen safe, scan or collect the current blocker, and return before pushing into the next unknown area.
Sulfur routes work best when the player follows heat-colored terrain and returns the same way.
Search thermal-looking rocks, vents, and shallow volcanic terrain.
Use this step as a route checkpoint, not as a promise that every object spawns in one exact coordinate. Match the landmark, compare the screenshot, then continue only if the return path is still clear.
If your game build looks different, stay with the same decision: keep oxygen safe, scan or collect the current blocker, and return before pushing into the next unknown area.
Look for the distinct yellow cluster against rock walls rather than sweeping open water.
Avoid diving deeper just because the route keeps going.
Use this step as a route checkpoint, not as a promise that every object spawns in one exact coordinate. Match the landmark, compare the screenshot, then continue only if the return path is still clear.
If your game build looks different, stay with the same decision: keep oxygen safe, scan or collect the current blocker, and return before pushing into the next unknown area.
Turn the pickup into a short loop; do not spend the last oxygen bar checking side rocks.
Return and craft after confirming the material instead of chasing a full stack.
Use this step as a route checkpoint, not as a promise that every object spawns in one exact coordinate. Match the landmark, compare the screenshot, then continue only if the return path is still clear.
If your game build looks different, stay with the same decision: keep oxygen safe, scan or collect the current blocker, and return before pushing into the next unknown area.
Sulfur routes work best when the player follows heat-colored terrain and returns the same way.
Track whether patches move the resource cluster or change route hazards.
Use this step as a route checkpoint, not as a promise that every object spawns in one exact coordinate. Match the landmark, compare the screenshot, then continue only if the return path is still clear.
If your game build looks different, stay with the same decision: keep oxygen safe, scan or collect the current blocker, and return before pushing into the next unknown area.
Look for the distinct yellow cluster against rock walls rather than sweeping open water.
After-action plan
What to do after the guide works
Bank the result
Track whether patches move the resource cluster or change route hazards.
Clean the inventory
Move route-critical materials into labeled storage so the next dive starts with empty space and a clear job.
Pick the next guide
A low-spoiler route for turning the first hour into tools, scans, storage, safer map knowledge, and repeatable early progression.
Next route queue
Use these as the next blockers to solve after this route. Each queue card keeps the same evidence style: source video, gameplay frames, and a written checklist.
 Best immediate follow-up
Early Access Starting Route
A low-spoiler route for turning the first hour into tools, scans, storage, safer map knowledge, and repeatable early progression.
 Use if the route branches
Resource Priority List
Which resources to prioritize first, which to store, and which to avoid hoarding until a recipe proves they matter.
 Save for the next dive
Welcome Center First Route
A first-objective route from the Lifepod toward the Welcome Center, Anita, Chap, Camp One, and the Old Habitat lead-ins.
Detailed notes
Sulfur is a route material
Sulfur is best handled as a route note: direction, landmark, terrain type, and hazard. That structure stays useful even if exact nodes shift.
How to use this in-game
Turn this note into one action before leaving base: decide the objective, keep only the materials or tools that support it, then stop the route once the scan, pickup, or landmark is confirmed. This keeps the guide useful even when Early Access patches move small details.
What makes a good farming loop
A good loop starts from a safe landmark, reaches the resource in one readable direction, and returns before oxygen or heat pressure forces a mistake.
How to use this in-game
Turn this note into one action before leaving base: decide the objective, keep only the materials or tools that support it, then stop the route once the scan, pickup, or landmark is confirmed. This keeps the guide useful even when Early Access patches move small details.
How to spot Sulfur faster
The useful visual clue is contrast: yellow sulfur against darker rock, usually close enough to terrain that sweeping open water wastes time. Move from landmark to wall, inspect the pocket, then return before chasing the next cluster.
Yellow cluster
Rock wall
Short loop
How to use this in-game
Turn this note into one action before leaving base: decide the objective, keep only the materials or tools that support it, then stop the route once the scan, pickup, or landmark is confirmed. This keeps the guide useful even when Early Access patches move small details.
Heat and oxygen rules
Thermal routes invite one-more-node mistakes. Set the return point before you collect the first pocket, and treat rising heat, low visibility, or a lost landmark as the signal to stop farming.
How to use this in-game
Turn this note into one action before leaving base: decide the objective, keep only the materials or tools that support it, then stop the route once the scan, pickup, or landmark is confirmed. This keeps the guide useful even when Early Access patches move small details.
When the first Sulfur run is complete
A successful Sulfur trip does not need a full inventory. It needs one confirmed pocket, one recognizable return line, and one craft that benefits from the material. Once those are true, return to base and turn the find into a repeatable route note before chasing a larger stack.
How to use this in-game
Turn this note into one action before leaving base: decide the objective, keep only the materials or tools that support it, then stop the route once the scan, pickup, or landmark is confirmed. This keeps the guide useful even when Early Access patches move small details.
Sulfur visual clues
Sulfur is easiest to find when you stop scanning the whole ocean and start checking contrast: yellow material, darker rock, thermal-looking pockets, and terrain that creates small collection zones. Slow, close inspection beats long random swimming.
How to use this in-game
Turn this note into one action before leaving base: decide the objective, keep only the materials or tools that support it, then stop the route once the scan, pickup, or landmark is confirmed. This keeps the guide useful even when Early Access patches move small details.
Do not overfarm sulfur
Sulfur feels rare enough that players overreact once they find it. Take enough for the immediate craft, mark the route, and leave. A known pocket is more valuable than a risky full inventory because you can come back when oxygen, storage, and route confidence improve.
How to use this in-game
Turn this note into one action before leaving base: decide the objective, keep only the materials or tools that support it, then stop the route once the scan, pickup, or landmark is confirmed. This keeps the guide useful even when Early Access patches move small details.
Video route notes
Sulfur Location Guide should be followed as a resource route, not as a memory test. Start by watching the first route movement and naming the entry condition before copying the path in-game. Use the Welcome Center direction as an early southeast route anchor. Then pause again when the video reaches the first visible proof point, because that is where the guide changes from general advice into an action you can repeat. Search thermal-looking rocks, vents, and shallow volcanic terrain. If the route starts to feel different in your build, keep the same player goal: repeat the route without relying on a perfect coordinate.
Entry check: Starter route knowledge
Route action: Use the Welcome Center direction as an early southeast route anchor.
Proof to look for: material or fragment proof
Version note: Early Access / tracking
How to use this in-game
Turn this note into one action before leaving base: decide the objective, keep only the materials or tools that support it, then stop the route once the scan, pickup, or landmark is confirmed. This keeps the guide useful even when Early Access patches move small details.
Screenshot checkpoints
Use screenshots as checkpoints instead of decoration. The first image should answer where the route begins, the second should show what confirms progress, and the third should explain what to do after the scan, pickup, puzzle state, or threat read is visible. Avoid diving deeper just because the route keeps going. This is especially important in Early Access because exact positions can drift while landmarks, depth bands, room states, and player decisions stay useful. A good screenshot lets you say, "I am at the right kind of place," before you risk oxygen, storage space, or vehicle safety.
Entry frame: match the landmark before moving deeper
Proof frame: confirm material or fragment proof
Exit frame: know the return direction before adding side goals
Loadout frame: check Oxygen margin
How to use this in-game
Turn this note into one action before leaving base: decide the objective, keep only the materials or tools that support it, then stop the route once the scan, pickup, or landmark is confirmed. This keeps the guide useful even when Early Access patches move small details.
Stop rule and next dive
The most useful part of this page is the stop rule. Confusing the route direction with a fixed permanent spawn. Overstaying near thermal terrain with low oxygen. When the objective is confirmed, return and convert it into progress: craft the upgrade, sort the material, save the route note, or mark the blocker as solved. If the route fails, do not repeat the same swim blindly. Change one variable at a time: enter from a clearer landmark, reduce inventory clutter, bring the missing tool, or wait until oxygen and vehicle support match the route. That turns a failed resource route into better field knowledge instead of another full-inventory wander.
How to use this in-game
Turn this note into one action before leaving base: decide the objective, keep only the materials or tools that support it, then stop the route once the scan, pickup, or landmark is confirmed. This keeps the guide useful even when Early Access patches move small details.
Common mistakes
Confusing the route direction with a fixed permanent spawn.
Overstaying near thermal terrain with low oxygen.
Ignoring nearby landmarks that would make the run repeatable.
FAQ
Is this guide for the current Subnautica 2 build?
This page is written for Early Access and includes a visible update date. Treat exact values as tracking notes until the current build is field-tested.
Does this page use official screenshots?
Pages combine attributed official Steam / Unknown Worlds media, local gameplay frame captures, and source-video evidence cards. New player-submitted captures should keep the route, timestamp, and build context attached.
Community notes
Add a field report
Player reports enter a moderation queue. Approved notes can load from Supabase; pending drafts stay visible in this browser for follow-up.
Near starter shallows
Approx. 70-120m from pod
Confirm oxygen before leaving the first landmark. The route is much safer when you mark the return path before collecting side materials.
Guide-wide
N/A
Creature patrol ranges and fragment placement can shift between builds, so treat exact distances as field estimates until multiple players confirm them.